|
<< Click to Display Table of Contents >> Importing Lab Data |
  
|
|
<< Click to Display Table of Contents >> Importing Lab Data |
|
After a project has been opened, data for multiple lab analyses can be imported from an Excel or CSV file by selecting File > Import > Excel/CSV Data > Lab Data. The Import Lab Results form will be displayed.
This form is used to specify the Excel/CSV file to be imported and the cell correspondence between the file and the lab data. The cell ranges to be imported will include sample, parameter, and result information and lab result descriptors. If it is a Data Specific project (ex. MEWS) then the lab result descriptors will be those specified for that type of project.
The file to be imported should be specified first in the File Name on the form. It can be selected using the button to the right. If a script is being used to specify the cell range data, it should be selected next by clicking on the Open Script button.
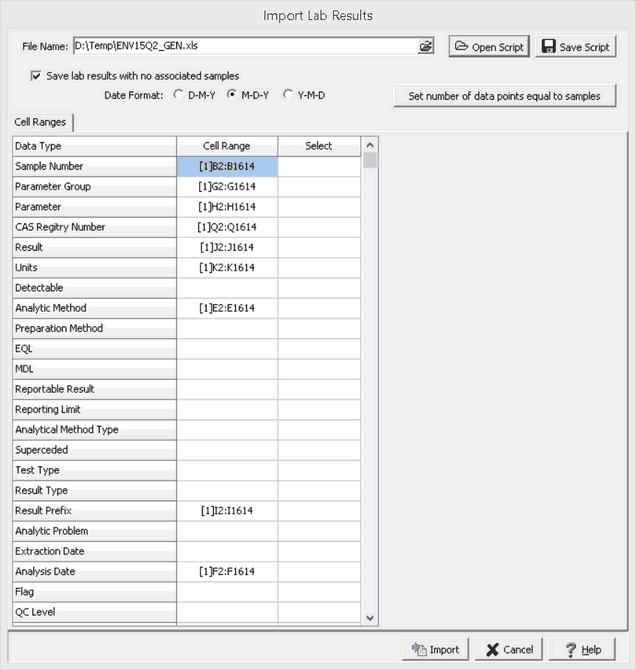
When importing a lab analysis it will associate an existing sample in the project using the sample number. If there is no existing sample the lab analysis will not be imported unless the Save lab results with no associates samples is checked. If this is checked then a new sample will be created and associated with the lab analysis.
The Date Format to use when importing analysis dates can be specified at the top of the form. These dates should have either a "-" or "/" separator between the day, month and year. This will not be shown for some types of Data Specific projects.
The Cell Ranges tab is used to specify the correspondence between cells in the file and the lab data. These data types can be imported by specifying the cell range in the Cells column. If no cell range is specified for the data type, that data will not be imported. The cell range can be specified by typing it in or by clicking on the Select column to the right of the cell range. A Select button will be displayed in the column, click on this button to display the data in the file in the Excel tab.
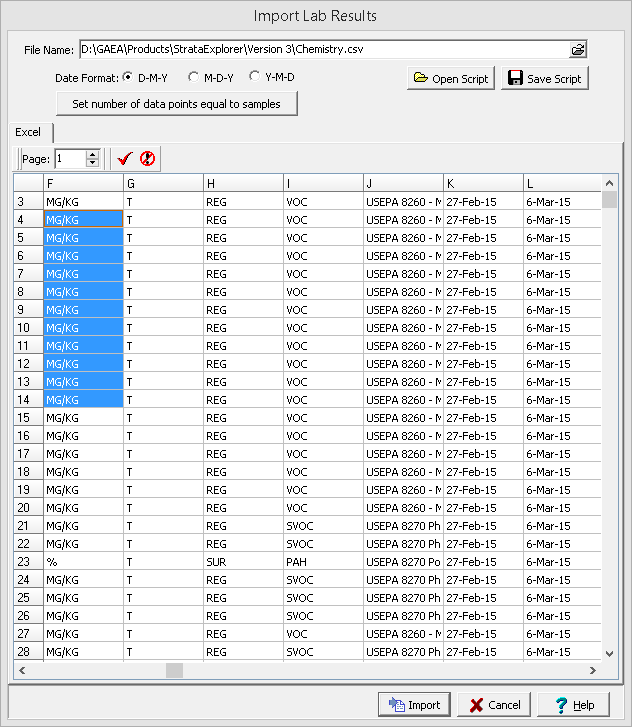
To select the cell range, click on the first cell and then hold the left mouse button down while selecting the cells. When the cell range has been selected, click the right mouse button or the Ok button on the toolbar above to return to the Cell Ranges tab. The selected cell range will be filled in on the form. This operation can be repeated until all of the cell ranges for the data types have been specified. The data in the Excel spreadsheet can be on multiple sheets. To select a cell range from a different sheet use the up and down buttons beside the Page on the toolbar.
When all of the cell ranges that are to be imported are entered, click on the Save Script button to save the cell ranges so they can be used for the next file to be imported.
All of the cell ranges should have the same number of cells in them, this can be set to the number specified for the Sample Number by clicking the Set number of data points equal to samples button. To import the data, click on the Import button.