|
<< Click to Display Table of Contents >> Editing a Photo |
  
|
|
<< Click to Display Table of Contents >> Editing a Photo |
|
Existing photos on a template can be editing by:
•selecting Edit > Photo then clicking on the photo
•double-clicking on the photo object on the sidebar
•clicking on the photo on the template and then selecting Edit from the popup menu
The Photo Information form will be displayed.
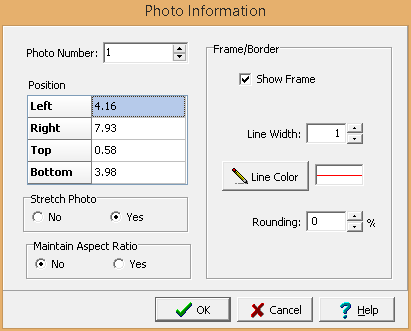
The following information can be edited on this form:
Photo Number: This is the number of the photo to display on the test report. The first photo added on the Test Information Tab of a test is number one, the second is number two, etc.
Left: This is the position of the left border of the photo in inches or millimeters from the left side of the page.
Right: This is the position of the right border of the photo in inches or millimeters from the left side of the page.
Top: This is the position of the top border of the photo in inches or millimeters from the top of the page.
Bottom: This is the position of the bottom border of the photo in inches or millimeters from the top of the page.
Stretch Bitmap: Select yes to stretch the photo to fit within the specified borders.
Maintain Aspect Ratio: Select yes to keep the aspect ratio of the photo.
Frame Border: This is used to specify whether to draw a border around the title block. If a border is being drawn, the width, color, and rounding of the border line can be specified.
Line Style: This is the style of the rectangle border. The line style can be changed by pressing the Line Style button. The Line Properties form will then be displayed. Using this form the style, color, and width of the rectangle border can be set.