|
<< Click to Display Table of Contents >> Editing a Polygon |
  
|
|
<< Click to Display Table of Contents >> Editing a Polygon |
|
Existing polygons on a template can be editing by:
•selecting Edit > Polygon then clicking on the polygon
•double-clicking on the polygon object on the sidebar
•clicking on the polygon on the template and then selecting Edit from the popup menu
The Edit Polygons form will be displayed.
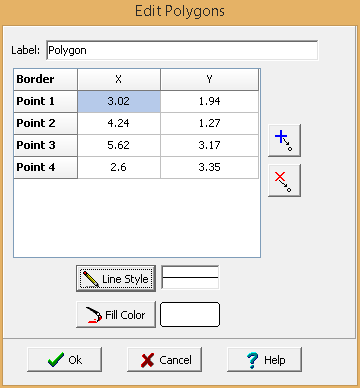
The following information can be edited on this form:
Label: This is a label used to list the polygon in the side bar.
Points: These are the positions of the points in inches or millimeters of the polygon boundary. If the Polygon button on the toolbar is used to create the polygon, these positions will be filled in by the program. Points can be added and deleted using the buttons on the right.
Line Style: This is the style of the polygon boundary. The line style can be changed by pressing the Line Style button. The Line Properties form will then be displayed. Using this form the style, color, and width of the polygon boundary can be set.
Fill Color: This is the color to use to fill the inside of the polygon. When the Fill Color button is pressed, the Color form is displayed. Using this form, a basic color can be selected or a custom color can be specified.