|
<< Click to Display Table of Contents >> Editing Fault Lines |
  
|
|
<< Click to Display Table of Contents >> Editing Fault Lines |
|
Existing fault lines can be edited by selecting Edit > Faults > Edit Fault Lines, Popup > Faults > Edit Fault Lines or clicking on the Faults button on the toolbar and selecting Edit Fault Line. The Faults form will then be displayed. At the bottom of this form there are buttons to move to the first fault, move to the previous fault, move to the next fault, move to the last fault, add a fault, and delete a fault.
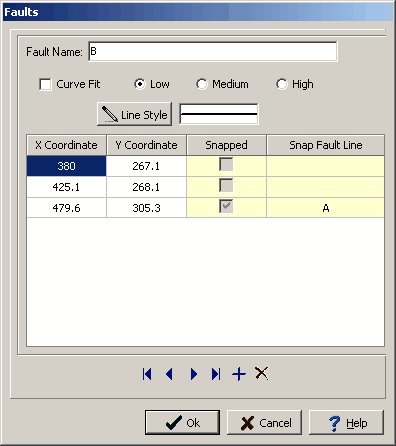
The following information can be edited on this form:
Fault Name: This is the name to use for the fault.
Curve Fit: Check this box to fit a curve to the line segments for the fault. If this box is checked the degree of curve fit (low, medium, or high) can be selected.
Line Style: Click this button to change the line style for the fault line. A Line Properties form will be displayed where the line style, color, and width can be selected.
X Coordinate: This is the x coordinate of the point in the fault line.
Y Coordinate: This is the y coordinate of the point in the fault line.
Snapped: This box will be checked if this point is snapped to another fault. The box is assigned when the fault is drawn and can not be edited.
Snap Fault Line: If the point is snapped to another fault, this is the fault that it is snapped to. The box is assigned when the fault is drawn and can not be edited.