|
<< Click to Display Table of Contents >> Editing a Table |
  
|
|
<< Click to Display Table of Contents >> Editing a Table |
|
Existing tables on a log can be editing by:
•selecting Edit > Tables
•double-clicking on the table object on the sidebar
•clicking on the table on the log
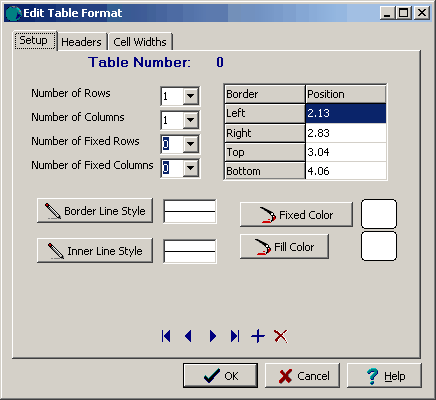
After performing one of the above tasks, the Edit Tables form will be displayed. This form has three tabs for the table setup, headers, and cell widths.
Setup Tab
(The appearance of the form will differ slightly depending on if it is WinLoG or WinLoG RT)
The following information can be edited on this tab:
Number of Rows: The number of rows in the table.
Number of Columns: The number of columns in the table.
Number of Fixed Rows: The number of fixed rows in the table. Fixed rows contain information that can only be entered / edited from the template. Usually information such as titles for tables is entered from the template
Number of Fixed Columns: The number of fixed columns in the table. Fixed columns contain information that can only be edited / entered from the template. Usually information such as titles for tables is entered from the template.
Left: This is the position of the left border of the table in inches or millimeters from the left side of the page. .
Right: This is the position of the right border of the table in inches or millimeters from the left side of the page.
Top: This is the position of the top border of the table in inches or millimeters from the top of the page.
Bottom: This is the position of the bottom border of the table in inches or millimeters from the top of the page.
Border Line Style: This is the line style of the outside border of the template table. It includes the lines thickness and style (Solid, Dash Dot, etc.)
Inner Line Style: This is the line style of the lines between the individual cells of a template table. It includes the lines thickness and style (Solid, Dash Dot, etc.)
Fixed Color: This is the background color of the fixed columns of the table.When the button is pressed a Color form will be displayed.
Fill Color: This is the background color of the non-fixed columns of the table.When the button is pressed a Color form will be displayed.
At the bottom of this form there are buttons to move to the first, previous, next, and last rectangle or to add and delete rectangles.
Headers Tab
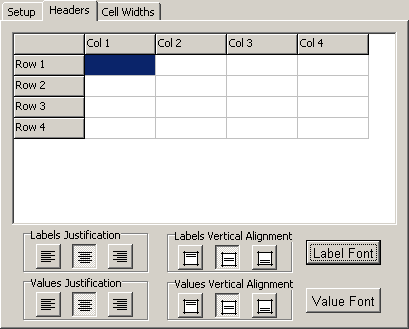
The following information can be edited on this tab:
Table Headers: Headers can be entered for each fixed column in table. In this example, there is one fixed column and one fixed row.
Labels and Values Justification: The Left Justify button will left justify the text, the Center Justify button will center justify the text, and the Right Justify button will right justify the text.
Labels and Values Alignment: The Top align button will align the text with the top of the table cells, the Center align button will align the text in the center of the table cells, and the Bottom align button will the text with the bottom of the table cells.
Label Font: The Label Font button lets the user set the font type of the column and row headers.
Value Font: The Value Font button lets the user set the font type of the column and row values.
Cell Widths Tab
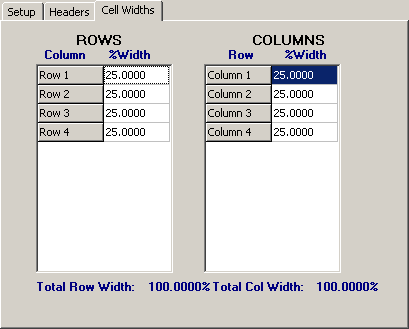
The following information can be edited on this tab:
Column Widths: Column width is the width of a individual column as a percentage of the total table width. The value should add up to 100%
Row Widths: Row width is the width of a individual row as a percentage of the total table height. The value should add up to 100%