|
<< Click to Display Table of Contents >> Columns Tab |
  
|
|
<< Click to Display Table of Contents >> Columns Tab |
|
(The appearance of the form will differ slightly depending on if it is WinLoG or WinLoG RT)
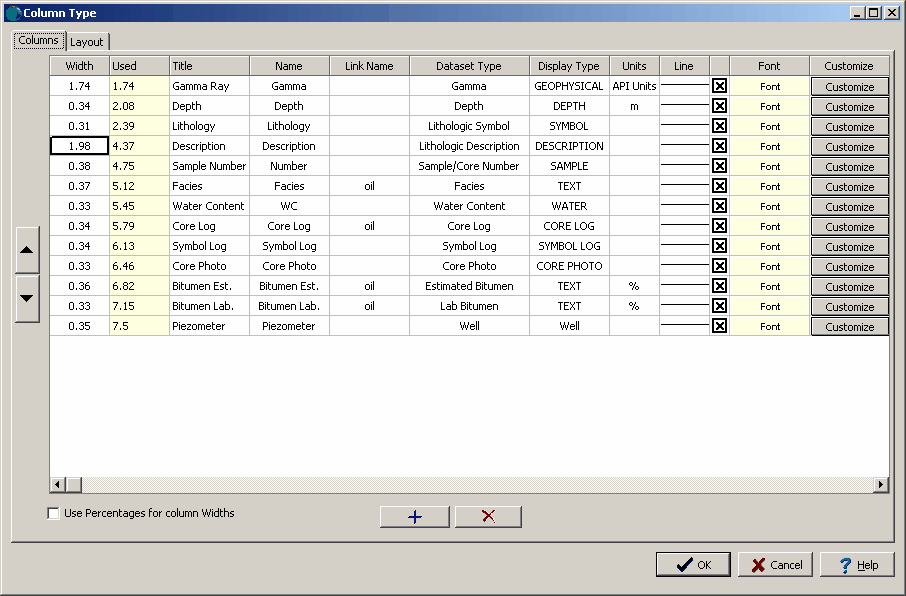
This tab has one row for each column in the template. The left most columns are at the top of the list. The Columns tab and Page 2+ Columns tab can be used to edit the following information for each row:
Width: This is the width of the column in page units. The position of the column on the page is determined by the left boundary of the columns in the layout and the width of the columns before it.
Used: This is how much of the width has been used for the columns so far starting from the left. The amount of space available for the columns is determined by the left and right boundaries set in the layout.
Title: This is the title to display for the column. The title does not have to be the same as the column name and does not have to be unique. To display the title on more than one line use the Enter key. For graph columns, the title is entered on the Graph Properties form using the Customize button. When this column is clicked on a box will be displayed where the title can be entered. In addition, two checkboxes will be displayed where the title can be specified as being displayed hhorizontally or vertically.
Name: This is the unique name to use for the column. The name can be the same as the title.
Link Name: Some columns such as “Description”, "Text", “Text Interval”, “Facies”, “Constituents”, or “Members” can be linked to other columns so that the depths for the data only have to entered once. This field is used to specify the link name of the column. If left blank then the column will not be part of a linked interval. If the column can not be linked this field will not be able to be edited.
Dataset Type: This is the type of dataset that can be entered in the column. When this column is clicked on a list will be displayed showing the types of datasets available. This list of datasets will vary by industry.
Display Type: This is used to select the way to display the data for the column. For some columns such as text and graphs there is more than one way to display the data. If the dataset type supports more than one method of display, a list of display types will be shown when this column is clicked on. The majority of columns only support one display type and this field can not be changed.
Units: This is used to specify optional units for the dataset.
Line: This is the line style to use for the right border of the column. The line style of the left border will be controlled by the previous column. To change the line style, click on this column and a Line button will be displayed. When this button is clicked on the Line Properties form will be displayed. This form can be used to set the line style, width, and color.
Use Default Font: This checkbox should be checked to use the default column font specified in the layout tab. If this is checked, the Column Font button will not appear.
Column Font: Click this button to change the font to use for this column. Each column can use a different font if desired. The title of the column will still be displayed in the default column font. However, all of the column data will use this font. When pressed the Font form will be displayed. This form can be used to select the font name, font style, font size, and color.
Customize: Depending upon the type of column, this button will be enabled or disabled. If the column can be customized it will be enabled. Press the button to customize the specific properties of the column. The form displayed will depend on the type of column as described in the sections below.
![]()
![]()
At the left side of the tab there are two buttons that can be used to move the column up and down in the list. This will determine their position on the page. The columns at the top of the list will appear on the left.
![]()
![]()
At the bottom of the tab are two button that can be used to add and delete columns.