|
<< Click to Display Table of Contents >> Layout |
  
|
|
<< Click to Display Table of Contents >> Layout |
|
(The appearance of the form will differ slightly depending on if it is WinLoG or WinLoG RT)
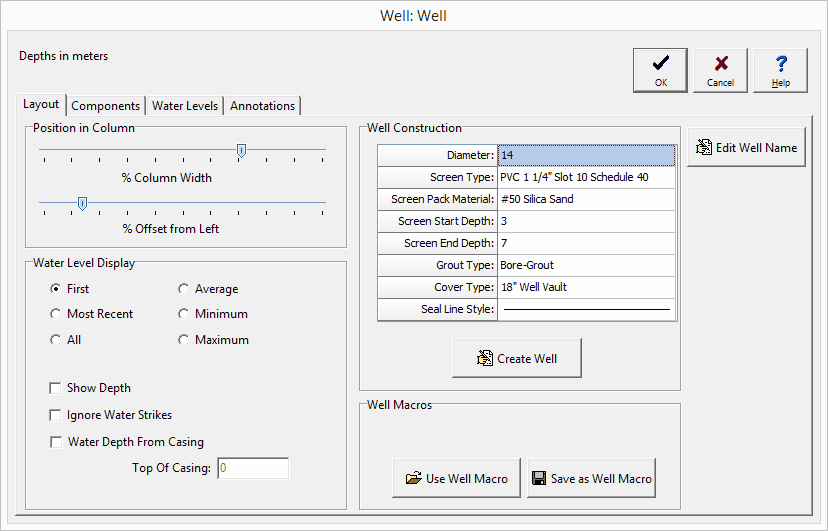
The following information can be edited using the Layout tab:
Position in Column
% Column Width: This is the percentage of the width of the column to use for the hole. The horizontal scale of the well column will then be set such that the hole diameter specified above is equal to this percentage of column width. When setting the % of Column Width space should be made on the sides of the hole for annotation.
% Offset Left: This is the percentage of the column width to offset the hole from the left side of the column. This parameter is used to position the hole inside the column. The sum of the % Offset and
% of Column Width should always be less than or equal to 100. For example, if the % of Column Width is 70 and the % Offset is 10. Then the leftmost 10% of the column would be used for annotation, the next 70% of the column would contain the well components, and the last 20% of the column would be used for annotation.
Water Level Display
Water Level Display Type: This is used to select the type of water levels to display when there are multiple water levels.
Show Depth: This will automatically annotate the water depth on the log.
Ignore Water Strikes: When there are multiple water levels, check this box to not include water strikes.
Water Depth from Casing: Check this box to indicate that the water depths are measured from the top of the casing.
Well Construction
The components and annotation can be automatically created by the program using the information specified for the well construction.
Diameter: This is the outside diameter of the well.
Screen Type: This is used to select the type and diameter of the screen.
Screen Pack Material: This is used to select the packing material around the screen.
Screen Start Depth: This is used to specify the start depth of the screen.
Screen End Depth: This is used to specify the end depth of the screen.
Grout Type: This is used to select the type of grout used in the well.
Cover Type: This is used to select the type and height of the well cover.
Seal Line Style: This is used to select the line style for the seal.
After this information has been specified click on the Create Well button to automatically generate the components and annotation for the well.
Well Macros
If a well macro is to be used it should be selected first by pressing the Use Well Macro button on the Layout tab. Well macros can also be created after the well data has been input for a log, using the Save as Well Macro button on the Layout tab. When this button is pressed a form will be displayed where you can specify the name of the well macro.
Well Name
The name of the well dataset can be changed by clicking on the Edit Well Name button at the bottom of the tab. A new unique well name can then be entered in the Edit Well Name form shown on the next page. Changing the name of the well dataset will affect whether the well is displayed in the log. For the well to be displayed the template must contain a well column with the same name.