|
<< Click to Display Table of Contents >> Importing Geophysical Data |
  
|
|
<< Click to Display Table of Contents >> Importing Geophysical Data |
|
Geophysical data can either be imported into a specific column of a log or just into the log itself. If no geophysical data has previously been imported for the column:
•click on the geophysical column on the log
•double-click on the geophysical object on the sidebar
•select Edit > Geophysical Data > Geophysical Column Name
•select Popup > Geophysical Column Name
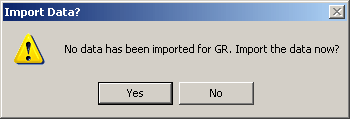
After this the Import Data form will be displayed, asking to confirm the importing of the data into that column. After this the Import Geophysical Log form will be displayed.
If the data is to be imported into the log and not a specific column, select Edit > Geophysical Data > Import Geophysical Log. The Import Geophysical Log form will be displayed.
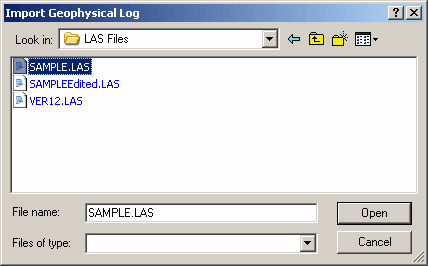
(The appearance of the form will differ slightly depending on if it is WinLoG or WinLoG RT)
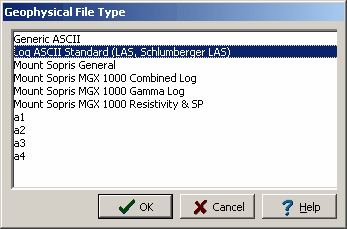
Select the name of the file to import and this form and then press the Open button and the Geophysical File Type form will be displayed.
(The appearance of the form will differ slightly depending on if it is WinLoG or WinLoG RT)
Several types of file formats are shown, if the format of your log is not shown try to use the Generic ASCII format; otherwise, contact GAEA to see if support for that format can be added. Select the format of the geophysical log file and then press the OK button. Depending upon the format of the geophysical file, you will then be prompted to select which curve (gamma ray, resistivity, SP, etc.) in the file to display. Some geophysical file formats support multiple curves in one file.
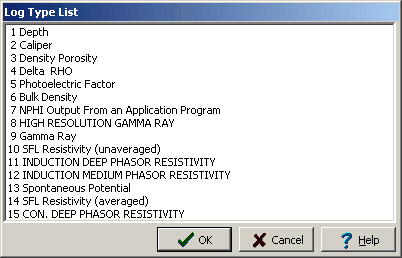
LAS Format
If the file format is LAS the Log Type List form will be displayed. Select the curve to display from the list of available curves in that file.
(The appearance of the form will differ slightly depending on if it is WinLoG or WinLoG RT)
ASCII Format
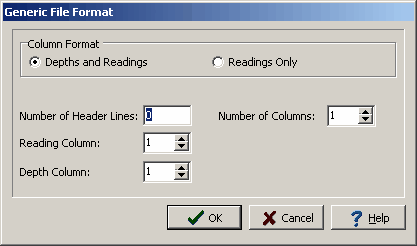
If the file format is Generic ASCII the Generic File Format form will be displayed.
(The appearance of the form will differ slightly depending on if it is WinLoG or WinLoG RT)
The following information can be entered on this form:
Column Format: The file can have either the depths and readings in columns or only the readings in a column. If the column format is “Depths and Readings” the depths of the data points will be extracted from the depth column. If the column format is “Readings Only” the depths of the data points will be calculated using the specified start depth and increment.
Number of Header Lines: This is the number of header lines in the file to skip before reading the data from the columns.
Number of Columns: This is the number of data columns in the file.
Reading Column: This is the number of the column (starting with column 1 at the left side of the file) that has the readings.
Depth Column: This is the number of the column that has the depths. If the Column Format is “Readings Only”, this field will not be displayed.
Start Depth: This is the start depth to use for the readings. If the Column Format is “Depths and Readings”, this field will not be displayed.
Depth Interval: This is the depth interval to use between readings. If the Column Format is “Depths and Readings”, this field will not be displayed.
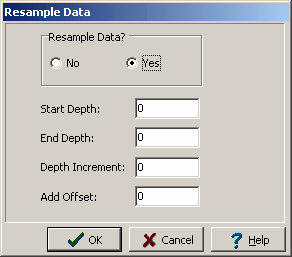
Resample Data
In order to save time and memory when displaying geophysical data, the data can be resampled at the time it is imported into the log. After the log type is selected, the Resample Data form will be displayed.
(The appearance of the form will differ slightly depending on if it is WinLoG or WinLoG RT)
The following parameters can be entered on this form:
Resample Data: This is used to select if the data is to be resampled. If No is checked the fields below will not be displayed.
Start Depth: The depth to start importing data, all samples from depths before the Start Depth will be ignored.
End Depth: The depth to stop importing data, all samples from depths after the End Depth will be ignored.
Depth Increment: The increment to use between depths when importing, any samples at depths between increments will be ignored. For example, if the Depth Increment is 1 and the file contains samples at depths 1.1, 1.6, and 2.1. The sample at depth 1.6 will be ignored.
Add Offset: This is an offset depth to be added to the depths in the file. This is used to adjust for instrument height if necessary. If Resample Data is set to No this field will not be displayed.
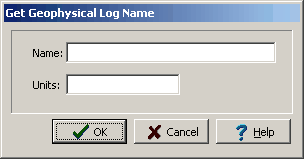
After the above information has been entered, the geophysical file will be imported. If the data is to be imported into the log and not a specific column the Get Geophysical Log Name form will be displayed. This form is used to specify the name and units of the log.
(The appearance of the form will differ slightly depending on if it is WinLoG or WinLoG RT)