|
<< Click to Display Table of Contents >> Customizing the Depth Column |
  
|
|
<< Click to Display Table of Contents >> Customizing the Depth Column |
|
The depth column of the template can be customized to set the plot depth per page, input units, and depth axis format. To customize the depth axis, select the Depth column and click on the Customize button on the Columns tab.
(The appearance of the form will differ slightly depending on if it is WinLoG or WinLoG RT)
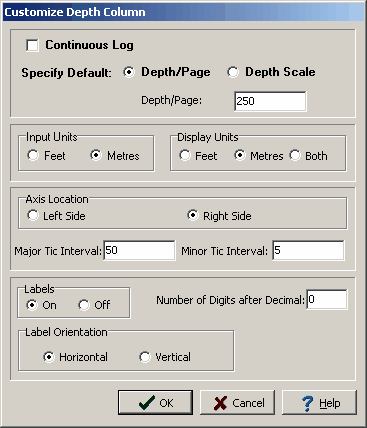
The Customize Depth Column form can be used to set the following parameters:
Continuous Log: Check this box if the template is to be used to create continuous logs with no page breaks. Continuous logs have a header on the first page and a footer on the last page with no page breaks in between.
Default Depth/Page or Depth Scale : The depth/page or depth scale determines the number of feet or meters that is displayed on each log sheet. This can be specified either as the depth per page (number of feet or meters per page) or as a depth scale (one page unit equals a specified number of log units). The depth per page specified in the template normally determines the plot depth per page; however, this can be overridden in the log by specifying a depth per page when editing the log.
Input Units: These are the units that will be used when entering depths for log data. The input units do not have to be the same as the display units.
Display Units: These are the display units of the depth axis. They can be feet, meters, or both. These units do not have to be the same as the input depth units. If both are specified, then the depth axis will have feet displayed on the left and meters displayed on the right.
Axis Location: The depth axis can be located on the left or right side of the depth column. If it is located on the left side of the column, the labels will appear on the right side of the tics. If it is located on the right side of the column, the labels will appear on the left side of the tics.
Major Tic Interval: This is depth interval between labels on the depth axis.
Minor Tic Interval: This is the depth interval between tics on the depth axis.
Labels: This is used to turn the depth labels on and off. If the labels are turned off the depth axis will be drawn with tics only.
Number of Digits after Decimal: This is the number of digits to display after the decimal in the labels. For example, if the number of digits is 1, then the depth 2 feet will be labeled as 2.0.
Label Orientation: This is the orientation of the depth labels, either horizontal or vertical.