|
<< Click to Display Table of Contents >> Lithology |
  
|
|
<< Click to Display Table of Contents >> Lithology |
|
Lithologic layers are used to indicate the subsurface strata encountered during drilling. Boring/Wells can contain an unlimited number of lithologic layers. A lithologic layer primarily consists of:
•an optional title (up to 255 characters),
•description (no limit on the number of characters),
•a top depth,
•an optional bottom depth, and
•the symbol to use for the layer.
The bottom depth of the lithologic layer can either be specified or the top depth of the next lithologic layer is used.
The lithologic descriptions are usually displayed in a Description column and the lithologic symbols are usually displayed in a Symbol column.
There are several ways to edit lithology data, either:
•click on the lithology description or symbol column on the log
•double click on the Symbol or Description object on the sidebar
•select Edit > Lithology
•or select Popup > Lithology
After this the Edit Lithologies form below will be displayed. The data columns to be displayed can be changed by right clicking on the first header row. A popup menu will be displayed showing all of the columns that can be displayed. Check the box next to the columns to display in the list.
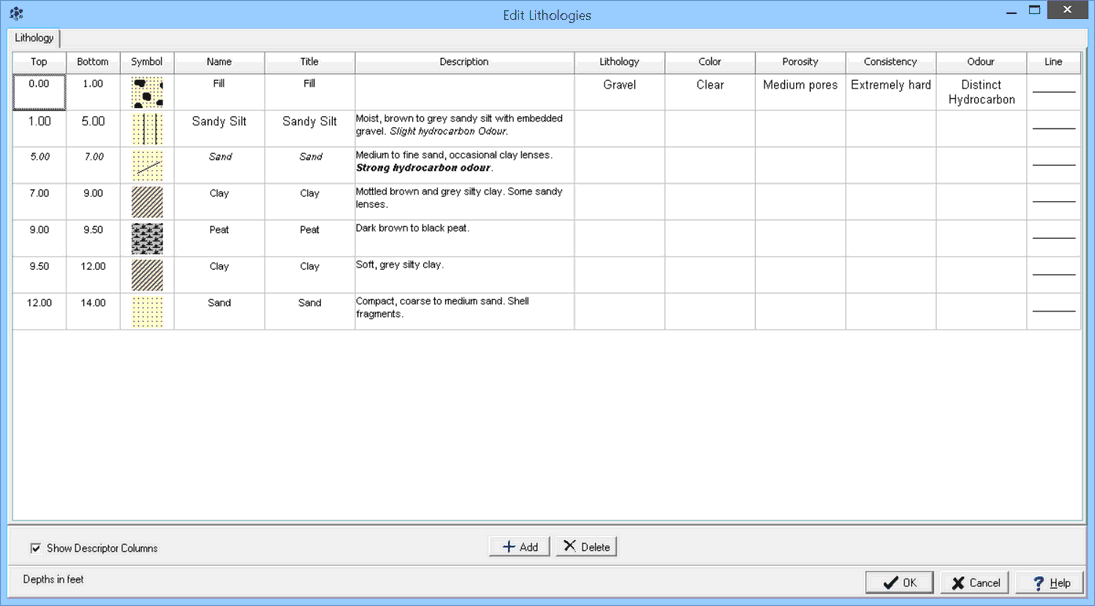
(The appearance of the form will differ slightly depending on if it is WinLoG or WinLoG RT)
The following information can be edited on this form:
Top: This is the top depth of the layer and should be between the start and end depths of the log.
Bottom: The bottom depth of the layer is optional. If it is not specified or is less than the top depth, the top depth of the next layer is used.
Symbol: This is the symbol used for the layer in the Lithology Symbol column. The symbol can be changed by clicking on it with the left or right mouse buttons. For more information see the section on Changing the Lithologic Symbol below.
Name: This is the strata name for the layer selected from the list of lithologic macros. It is used to quickly fill in the symbol, title, and description of the layer using the information specified in the lithology macro. It is also used in the Cross-Section module to quickly and accurately automatically generate strata for the cross-section. If the template for the log specifies the Title Edit mode as “Text” for the lithology description column, the Name column will not appear on this form. For more information see the section on Selecting Strata Names below.
Title: The optional name of the layer displayed above the description.
Description: The description is used to describe the lithology of the layer. At the right of the form there is a Rich Text toolbar that is used to format the description, add symbols, insert lithology macros, and perform spell checking on the description. The use of the Rich Text toolbar is described section below on Specifying the Lithology Description.
Lithology: This is used to select the lithology descriptor of the layer from a predefined list. This descriptor can be shown on the log depending on the settings for this column in the template.
Color: This is used to select the color descriptor of the layer from a predefined list. This descriptor can be shown on the log depending on the settings for this column in the template.
Porosity: This is used to select the porosity descriptor of the layer from a predefined list. This descriptor can be shown on the log depending on the settings for this column in the template.
Consistency: This is used to select the consistency descriptor of the layer from a predefined list. This descriptor can be shown on the log depending on the settings for this column in the template.
Odour: This is used to select the odour descriptor of the layer from a predefined list. This descriptor can be shown on the log depending on the settings for this column in the template.
Top Line Style: This is the line style to be used for the top layer boundary. If the bottom depth is specified this line style is also used for the bottom boundary. When the line is clicked on the Line Properties form is displayed. This form is used to set the line style, thickness, and color. The line style can be set to none to display no line at the boundary.
Show Descriptor Columns: Check this to show the descriptor columns for lithology, color, porosity, consistency, and odour on the form.
The column widths on the form can be adjusted by sliding the column boundaries using the left mouse button in the column header.
At the bottom of the form there are buttons for adding and deleting layers. In addition, layers can be added using the insert button on the keyboard.